Saturday, May 10, 2008

Vegan Yarn Review: Fibra Natura Sea Song


Sea Song is a soft, worsted weight natural fibre yarn consisting of 80% Pima cotton and 20% SeaCell®, a fibre derived from seaweed. The manufacturers make some claims about SeaCell which I find hard to believe, for example:

the structure of SeaCell® facilitates the active exchange of substances between the fiber and the skin – nutrients such as calcium, magnesium and vitamin E are released by the natural body moisture when the fiber is worn, thereby creating a complete sense of well-being.
Smartfiber AG website

However, even if these claims are overblown the fact remains that adding SeaCell to cotton results in a very soft, comfortable yarn—noticeably softer than 100% cotton.

Sea Song comes in seven solid colours and eight variegated colours. The knitted sample above is in Sea Color, a variegated periwinkle blue/light jade green. I liked the fact that it is not too contrasty; I find that sometimes high contrast variegated yarns create a bold pattern which distracts from the lines of the garment. However some of the other variegated colours, like Spring, which is periwinkle blue, chartreuse, and dark green, are more contrasty if that is what you prefer.

Knitted up, Sea Song produces a soft, lightweight fabric ideal for summer clothing. I did have to take some care to prevent splitting while I was working, but I gather this is par for the course with multi-stranded cotton yarns. The yarn has a matte look.

Sea Song is made in Turkey. The manufacturer recommends hand-washing. In Toronto, you can buy it at the Purple Purl

Argh! Need to frog Gracefully Gathered Halter Top again!

Defective Gracefully Gathered Halter Top.Because I fell in love with a yarn which was the wrong weight for this pattern (Fibra Natura Sea Song in Sea Colors), I have been struggling to knit the Gracefully Gathered Halter Top in Knitting Lingerie Style by Joan McGowan Michael. The gauge is totally different, so I had to completely rewrite the pattern for the correct stitch count.

The pattern specifies the finished size of the top rather than the body measurement, so I decided to allow an inch or two of ease around the bust. Mistake! After knitting a few inches, my top was looking way too wide, but I had a naive hope that all would be well when I blocked it. However after knitting 6 inches, it was painfully clear that the top was way way way too large.

I frogged it completely, and started over again, with a circumference 20 stitches smaller. After a few inches of that, it was clearly still much to big, so I had to frog it again!

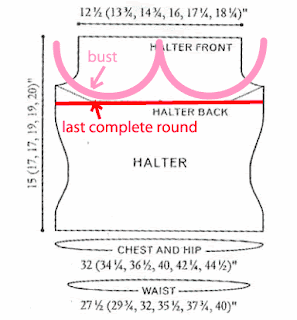
Diagram of Gracefully Gathered Halter Top from Knitting Lingerie Style, with my notes added in pink and red. Click to enlarge, see text for explanation.I eventually realized that, since on me the last complete round (shown as red in the diagram at the left) is below my bust (shown in pink), for me the circumference should be based on my under bust measurement, rather than my bust measurement. (This may not have been the way the designer intended it to fit, but then she won't be wearing it.) This is my third attempt, with a circumference of 140 stitches at the widest points (vs. the original 186), which gives slightly less than zero ease under the bust.

I stayed up way too late last night to finish it, trying it on periodically. I have got the circumference right at last (yay), although I had some trouble because now my circular needle is a bit too long (80 cm/~31" needle, ~71cm/~28" wide knitting). However, when I finally added the straps, I found that they cut painfully into my underarm area (where I put red circles on the photo at the top). This is partly my fault because I decreased by 12 stitches as specified in the pattern rather than adjusting for the smaller gauge of the yarn I was using, and I guess partly because I'm built differently. I'm going to have to frog the strap and top few inches and redo it two or three inches narrower. I'm also going to make the straps quite a bit longer, since I want to be able to tie them in a bow which is currently impossible. They are currently 16", I plan to make them 24" at least.

Friday, May 9, 2008

Sexy Knitters Club new knitalong is starting soon

Labyrinth sweater designed by Wendy Bernard
Aleita Shell designed by Bonnie Marie Burns
Notorious designed by Annie Modesitt
The voting for the next knitalog at the Sexy Knitters Club was supposed to end last night at midnight (timezone not specified). Although the results haven't been announced yet, it looks like the winners are Labyrinth by Wendy Bernard; Aleita Shell, by Bonnie Marie Burns, in Interweave Knits Spring 2008; and Notorious, by Annie Modesitt, in her book Romantic Hand Knits; far ahead of the others at 26 votes each. (I voted for Sodera Socks by Vilma).

I haven't decided yet if I'll join in on this knitalong. I don't like either the Aleita Shell or Labyrinth enough to invest the time to knit them, and while Notorious is gorgeous, it, like Labyrinth, is too low-cut for my build. I also don't like the way the rows of eyelets on the front curve out like this: (), I think they should either be like || or like )(.

I am leaning towards doing Notorious, but modifying the lower body so it doesn't have those eyelets, maybe just doing some kind of rib, and making the neckline a tad higher. It will probably depend on if any suitable yarn catches my eye when I go to the Purple Purl tomorrow to exchange the extra balls of Sea Song left over from my Gracefully Gathered Halter Top (the purple and blue top shown in that link isn't mine, it's by someone called shadkitty).

Webkinz hospital's first patients: Harbour Seal and Charcoal Cat

Webkinz Harbor Seal Snowy after facial reconstruction and eye replacement.My landlords' dog Rex is a very sweet friendly golden retriever with an unfortunate habit of tearing up clothing, stuffed animals, and even their daughter's Webkinz (who my son insists are not stuffed toys but real live animals). Nicky says the dog is named Rex "because he wrecks everything."

I was pessimistic about how well I would be able to repair these Webkinz' faces (Rex always goes for the eyes), so I didn't bother taking a before picture of my first patient, Snowy the Webkinz Harbor Seal (photo at right). Snowy had lost both eyes and eyebrows, and a large chunk of her left cheek.

All repairs were done with three strands of embroidery floss; facial features were drawn on with a fast fade marker using photos of Webkinz online as models before embroidering.

To repair Snowy's face, I used white floss to darn over the holes in her "skin", leaving an opening to make embroidering the eyes and eyebrows easier. I embroidered the eyes in dark navy (the closest I had to black) satin stitch, with a stitch of white for the highlights, and the eyebrows in dark navy back stitch, before closing up the darning.

Noelle, Webkinz Charcoal cat, face mutilated by dog.Noelle, a Webkinz Charcoal Cat, was the most seriously injured, having had a large portion of her face torn off (see photo at left, click to zoom). Her beautiful blue-grey fur, which changes colour depending on the angle of the light, was very difficult to match. I ended up using DMC colour #414, which is not a perfect match by any means, but the resulting repair looks much better than I had feared (see photo at right; click to zoom). As with Snowy, I darned most of the face but left an opening to use while I embroidered her facial features, then put in some stuffing and closed the darning.

Noelle, Webkinz Charcoal Cat, after extensive facial repair.Since I could not match her original nose and mouth embroidery either, I decided to remove it and replace it completely with DMC #768. Although her original mouth was an upside-down Y, I decided to embroider her mouth with the corners curving up in a smile. The three strands I used don't show up very well—perhaps I should have used six?

For the replacement eye, I built it up in layers of satin stitch to try to make it a bit rounded, like the remaining original. First I embroidered a green circle (DMC #471) in satin stitch for the iris; then I embroidered a blackish circle on top of that for the pupil (DMC #3371, which looked black in the store but is really dark brown), and finished off with a white stitch for the highlight. I also used this blackish thread to replace Noelle's whiskers.

I'm not totally happy with the replacement eye, because the shape is not a perfect circle and although the placement seemed correct when I was doing it, with the stuffing inserted the new eye is not at the same height as the old. Next time I'm doing this type of repair I think I'll insert the stuffing before drawing the location of the new eye, then take the stuffing out to embroider.

There are still five more patients waiting treatment: Lily, a Lil Kinz Lion (missing both eyes and large chunks of her mane); Piggy, a Webkinz Pig (missing one eye); a Webkinz Pink Poodle (missing both eyes); Popeye, a Webkinz Pug (missing one eye, which I found under Anna's bed but have no idea how to reattach); and a Lil Kinz Googles (missing one nostril). I'll post their pictures as I get to them (if I can get my camera to work; last time I tried it kept complaining of a "focus error").

Saturday, April 26, 2008

"Blackwork" head scarf


Here's the pattern for a project I've been working on sporadically for the last few weeks. The pattern is adapted from a photo of a tray cloth embroidered by Olive Prior shown in Blackwork embroidery: Design and technique by Margaret Pascoe (London: B. T. Batsford Ltd., 1986). The pomegranate motif is a symbol of Catherine of Aragon, who is credited with introducing blackwork to England.

Although I am obviously deviating from the traditional colour scheme by working with purple floss on pink gingham, I will be making the design fully reversible in the best blackwork tradition. (I find Paula Kate Marmor's explanation of how to analyze patterns to render them in Holbein stitch most helpful.)

Thursday, April 17, 2008

How to crochet a lace head-scarf

I just learned to crochet and discovered it is surprisingly easy to create a fancy-looking piece such as this—and cheap too: this head covering used only a tiny fraction of a $7 ball of Circulo Cléa crochet cotton, which I bought at Mary Maxim at Yonge and Eglinton.

Here's how you can design your own.


  1. Measure over your head from ear to ear to determine the width of your scarf.
  2. Work up a swatch of filet crochet to determine your guage. I did 4DC filet mesh with a 2.5 mm hook (although after I was well into the project I realized that the Cléa label says to use a 1.25 mm hook; I was so distracted by the Portuguese labelling that I didn't notice that in the store and just guessed what size to use.)
  3. Figure out how many squares across you should make to get a scarf of the correct size. Choose the nearest odd number.
  4. Filet pattern for headscarf. Click to enlarge.On graph paper, work out a design. Mine (49 squares across) is shown at the right. Click to see a larger version. (I see that in drawing it on Adobe Illustrator I made a mistake, but you get the idea. If you have a larger head or smaller squares you could make a more interesting pattern.)
  5. For a scarf x squares wide, work a foundation chain of 3x + 1 (for 4DC filet mesh) or 2x + 1 (for 3DC filet mesh).
  6. Crochet following the chart you made. End off.
  7. Starting at one of the "side" corners, work the lace edging of your choice around the two short edges. Clea crochet lace pattern. Click to enlarge.I used the free pattern provided on the Cléa label, shown at left (click to enlarge). End off.
  8. For the ties, crochet two chains the desired length (mine are about 30 cm) and slip stitch to the side corners of the scarf. Then work a row of double crochet starting at the end of one tie, across the tie, across the scarf, and across the other tie. End off. Work in all ends.